How to Waterproof a Basement: 7 Methods That Actually Work (2026 Guide)
A wet basement destroys flooring, grows toxic mold, and cracks your foundation. Waterproofing stops all three — permanently, if done right. This guide covers all 7 methods used by professionals, exact costs, building code requirements, and an honest DIY vs. pro comparison. No filler.
5 Signs Your Basement Needs Waterproofing Now
Catch these early. Each one costs more to fix the longer you wait.
1. White powder on walls (efflorescence) — Salt deposits left behind when water moves through concrete. The wall looks chalky or crusty. This confirms water is actively pushing through your foundation.
2. Musty smell that never goes away — Mold needs 24–48 hours of moisture to start growing. A persistent damp smell means moisture levels stay high enough to feed mold colonies behind walls or under flooring.
3. Visible wall cracks — Horizontal cracks are the most serious. They signal lateral soil pressure (hydrostatic pressure) pushing inward. Vertical cracks usually come from settling. Either type lets water in.
4. Floor or wall stains and rust streaks — Brown or orange streaks come from rusting rebar or metal pipes inside the concrete. Water reached the metal. That means it also reached the concrete core.
5. Bowing or bulging walls — Soil saturated with water pushes against your foundation walls. Any inward curve greater than 2 inches needs a structural engineer before waterproofing. Fix the structure first.
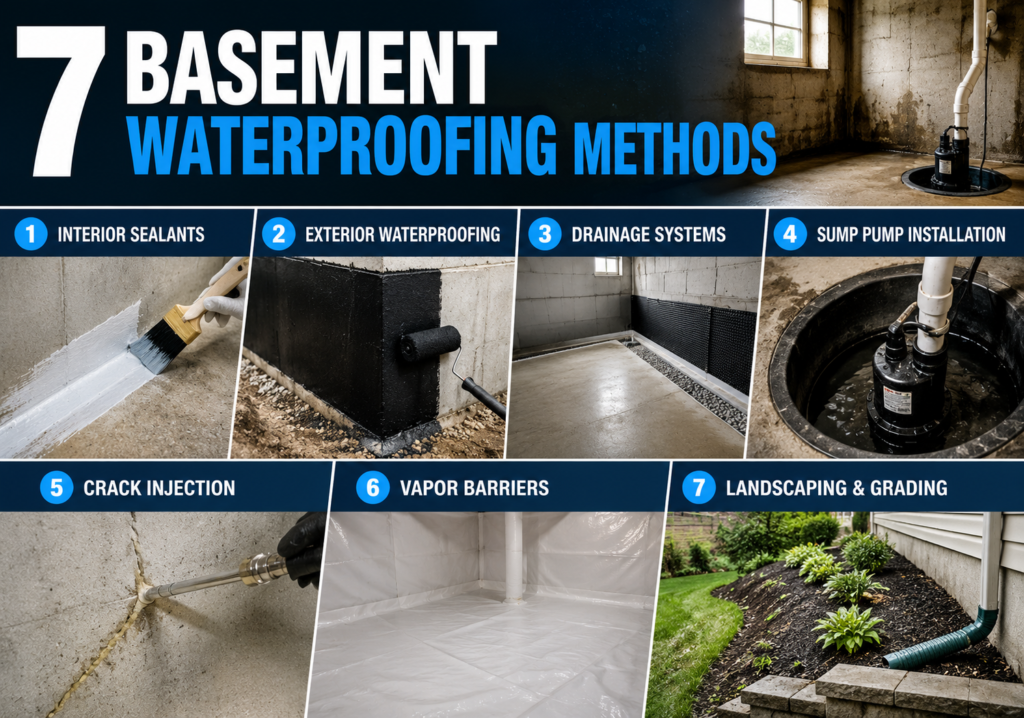
7 Basement Waterproofing Methods
Method 1 — Interior Sealants (Best for Minor Moisture)
Interior sealants like sodium silicate and crystalline compounds penetrate concrete up to 4 inches deep. Sodium silicate reacts with the lime in concrete to form a hard crystalline structure that fills microscopic pores. This blocks vapor transmission and capillary action.
To apply sodium silicate:
- Clean the wall completely — no paint, oil, or adhesives
- Lightly dampen the surface with a mop
- Apply 2–3 coats with a brush or garden sprayer, 10–20 minutes between coats
- Wipe excess before it dries to avoid white residue
Cost: $50–$200 for a 500 sq ft basement.
Limitation: Interior sealants handle moisture vapor and minor seepage. They cannot stop water under active hydrostatic pressure. Use them as a final layer after fixing the actual water source.
Method 2 — Crack Injection (Epoxy and Polyurethane)
Foundation cracks wider than 1/8 inch need injection, not surface patching. Surface-only patches fail within 1–2 seasons because water pressure finds the path of least resistance.
Epoxy injection works for dry, structural cracks. Epoxy bonds to concrete with higher tensile strength than the concrete itself. Mix ratio: 1 part hardener to 2 parts resin. Not flexible — do not use on cracks that move seasonally.
Polyurethane foam injection works for wet, actively leaking cracks. The foam expands 20–30 times its volume on contact with water, sealing the crack from the inside out. Flexible enough to handle minor foundation movement.
To inject a crack:
- Clean and dry the crack (for epoxy) or leave wet (for polyurethane)
- Install injection ports every 6–8 inches along the crack
- Inject from the lowest port upward until foam or epoxy emerges from the next port
- Cap each port and move up
Cost: $200–$500 DIY. $500–$3,000 professional per crack zone.
Method 3 — Interior French Drain System
An interior French drain does not stop water from entering. It intercepts water at the footing level and channels it to a sump pump before it floods the floor. This is the most common professional solution for chronic wet basements.
Installation steps:
- Break the concrete perimeter with a jackhammer, 12–18 inches from the wall
- Excavate a trench 6–10 inches deep down to the footing
- Lay perforated corrugated pipe on a 2-inch gravel bed
- Wrap pipe in landscape fabric (filter fabric) to prevent soil clogging
- Cover with gravel, then re-pour concrete over the trench
- Connect the pipe to the sump pit
The system works by gravity — water seeping through the walls hits the footing, drops into the pipe, and flows to the sump pit. The sump pump ejects it away from the house.
Cost: $3,000–$8,000 for a full perimeter system. Size and basement square footage affect price.
Method 4 — Sump Pump Installation
A sump pump is the final step in any interior waterproofing system. It pumps collected water through a discharge pipe to a location at least 10–15 feet from the foundation.
Sump pit excavation:
- Dig a pit in the lowest corner of the basement, approximately 18 inches wide × 24 inches deep
- Set a perforated sump liner (basin) in the pit
- Backfill around the liner with gravel
Sump pump types:
- Submersible pumps sit inside the pit, are quieter, and handle higher water volumes (2,000–3,000 GPH)
- Pedestal pumps sit above the pit, easier to service, lower cost
Critical addition — battery backup sump pump. Power failures happen during the exact storms that flood basements. A battery backup unit (12V marine battery) activates automatically when the primary pump fails or loses power. This one upgrade prevents the majority of sump pump failure flooding.
Cost: $300–$600 pump + $200–$500 installation. Battery backup adds $200–$400.
Method 5 — Exterior Waterproofing Membrane
Exterior waterproofing is the most permanent solution. It addresses water before it contacts the foundation. The process requires full excavation down to the footing — typically 8–10 feet deep around the entire foundation perimeter.
Membrane types:
Polyurethane liquid membrane — sprayed or rolled onto the cleaned foundation wall. Penetrates 1–2 inches into concrete. Flexible, handles minor foundation movement. Lifespan: up to 25 years.
Bentonite clay panels — rolled sheets with clay-based adhesive. As bentonite absorbs water, it swells and self-seals gaps. Lifespan: matches the life of the structure when kept below grade.
Thermoplastic sheet membrane (PVC/TPO) — heat-welded directly to the foundation wall, forming a continuous polymer barrier. Best for pipe penetrations, corners, and complex foundation geometries.
Cementitious coating — rigid, cement-based product applied like stucco. Less flexible than membrane systems but works well on block foundations.
After membrane application:
- Install a dimple drainage board (protection board) against the membrane
- Lay exterior perimeter drain pipe on gravel at the footing
- Backfill in 6-inch compacted layers using a mechanical compactor
- Regrade soil to slope 6 inches away over 10 feet
Cost: $8,000–$20,000+ depending on foundation depth, home size, and landscaping removal.
Method 6 — Exterior French Drain
An exterior French drain intercepts groundwater before it builds pressure against the foundation. Install it at the footing level, sloped toward a daylight outlet or dry well.
Key difference from interior French drain: Exterior drains prevent hydrostatic pressure from building. Interior drains manage water after it enters. Exterior is the better solution — interior is the more affordable one.
Trench depth: down to the bottom of the footing. Slope: minimum 1% grade (1 inch drop per 8 feet of run). Surround the perforated pipe with washed gravel, then filter fabric, then soil.
Cost: $1,500–$5,000 standalone. Usually combined with exterior membrane application.
Method 7 — Grading and Gutter Corrections
This is the cheapest fix and the first thing to try before any interior or exterior work. Fixing grading and gutters eliminates the water source rather than managing it after it arrives.
Grading corrections:
- Add clean fill soil against the foundation to create a downward slope
- Slope must drop at least 6 inches within the first 10 feet from the wall
- Avoid organic topsoil directly against the foundation — it retains moisture
Gutter and downspout fixes:
- Clean gutters twice yearly (spring and fall)
- Install downspout extensions minimum 10 feet from foundation
- Use splash blocks on hard surfaces to direct water away
- Check that underground downspout drains are not clogged or collapsed
These corrections alone fix 20–30% of wet basements. Always start here before spending money on drainage systems.
Cost: $200–$1,500 depending on landscaping scope.
Basement Waterproofing Cost Breakdown (2026)
| Method | DIY Cost | Professional Cost | Lifespan |
| Interior sealant | $50–$200 | $500–$1,500 | 5–10 years |
| Crack injection | $200–$500 | $500–$3,000 | 10–20 years |
| Interior French drain | $1,500–$3,000 | $3,000–$8,000 | 20–30 years |
| Sump pump + battery backup | $500–$1,000 | $800–$2,000 | 10–15 years |
| Exterior membrane | Not recommended DIY | $8,000–$20,000 | 25+ years |
| Exterior French drain | $500–$1,500 | $1,500–$5,000 | 20–30 years |
| Grading + gutters | $200–$800 | $500–$1,500 | Ongoing |
Factors that change cost: Basement size (sq ft), foundation depth, soil type (clay costs more to excavate), local labor rates, permit requirements, and whether existing landscaping or concrete needs removal.
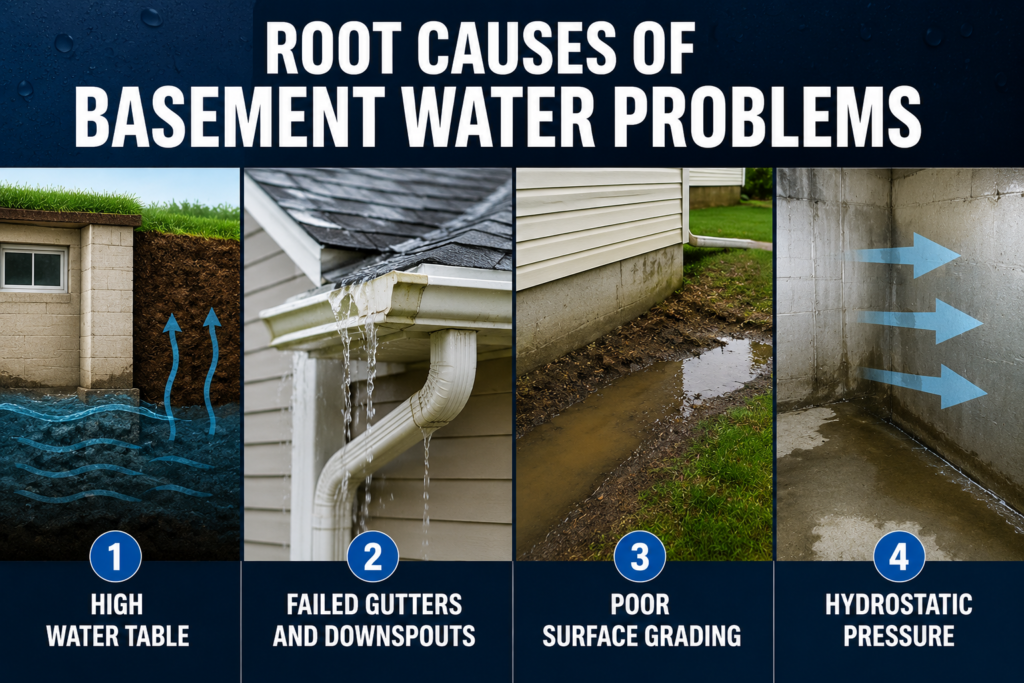
Root Causes of Basement Water Problems
Fix the source, not just the symptom. Water enters basements through 4 main pathways.
Hydrostatic pressure builds when groundwater saturates the soil around your foundation. Dense or clay-heavy soil holds water longer, increasing pressure against basement walls. Water eventually forces its way through cracks, joints, and even solid concrete through capillary action — the same process that pulls water up through a paper towel.
Poor surface grading directs rainwater toward your house instead of away. The ground should slope downward at least 6 inches over the first 10 feet from your foundation. Flat or inward-sloping yards collect water directly against basement walls.
Failed gutters and downspouts dump roof runoff right at the foundation. One inch of rain on a 1,500 sq ft roof produces roughly 935 gallons of water. Downspouts need to discharge at least 10 feet from the foundation.
High water table means groundwater sits close to or above your basement floor. Homes in flood zones, near rivers, or in low-lying areas deal with constant upward water pressure under the slab.
Dampproofing vs Waterproofing — Most People Get This Wrong
These two terms are not interchangeable. Dampproofing resists soil moisture only. Waterproofing resists liquid water under pressure.
The 2021 International Residential Code (IRC Section R406) and International Building Code (IBC Section 1805) both specify when each is required. Homes with basements below the water table require full waterproofing by code, not just dampproofing. Most new construction gets dampproofing — the cheaper option — which is why older homes often develop water problems within 10–15 years.
If your builder applied only a thin black bituminous coating on the exterior walls, your basement has dampproofing. That coating cracks, becomes brittle, and fails under sustained hydrostatic pressure. A proper waterproofing membrane is a different product entirely.
DIY vs Professional — Honest Breakdown
Do it yourself if:
- The problem is minor seepage or vapor moisture
- You’re applying interior sealants or patching hairline cracks
- You’re extending downspouts or regrading soil
- You have time, tools, and physical ability for concrete breaking
Hire a professional if:
- Water enters under pressure (you see active flow, not just dampness)
- Cracks are horizontal or the wall is bowing
- The problem covers the full perimeter
- Exterior excavation is required
- Your home is in a high water table area
The real risk of DIY exterior work: Improper backfill compaction causes soil settlement against the foundation wall within 2–3 years. Improperly installed drainage pipe that isn’t sloped correctly turns a $500 job into a $15,000 fix. Exterior waterproofing is one area where professional installation pays for itself.
Get 3 quotes minimum. Ask each contractor specifically about: membrane type and brand, drainage board installation, backfill compaction method, and warranty length. A reputable waterproofing company offers a transferable lifetime warranty on interior drainage systems.
Building Code Requirements
The 2021 IBC (Section 1805) and IRC (Section R406) set minimum standards:
- Basements below the water table require full waterproofing, not dampproofing
- Waterproofing membrane must cover foundation walls from footing to finished grade
- Drainage systems must connect to an approved outlet — daylight, sump, or storm sewer
- Some jurisdictions require a building permit for interior drainage work and sump pit excavation
Check local codes before starting. Unpermitted work can complicate home sales and void homeowner insurance claims for water damage.
Fix It Once. Fix It Right
A wet basement doesn’t fix itself. Every season you wait adds mold, structural damage, and repair costs on top of each other.
Start cheap. Regrade your soil, extend your downspouts, and seal visible cracks. These 3 steps alone fix roughly 30% of wet basements at under $500.
If water still enters, you have a hydrostatic pressure problem. An interior French drain with a battery-backup sump pump is your most cost-effective permanent fix in 2026. Exterior membrane work is reserved for severe cases: bowing walls, high water tables, or full foundation failure.
Match the method to the problem. Don’t pay for exterior excavation when a $300 crack injection solves it.
Get 3 contractor quotes. Ask about membrane type, warranty transferability, and permit requirements. Most licensed waterproofing contractors offer free inspections.
Waterproof your basement right in 2026 — it stays dry for 25+ years.
FAQ
How long does basement waterproofing last?
Interior sealants last 5–10 years. Interior drainage systems last 20–30 years with annual sump pump maintenance. Exterior polyurethane membranes last up to 25 years. Bentonite clay panels last the lifetime of the structure below grade.
Can I waterproof a basement from the inside only?
Yes, but with limits. Interior systems manage water after it enters — they do not stop hydrostatic pressure. For severe water problems or high water table areas, interior-only solutions need to be paired with a sump pump to be effective.
Does basement waterproofing increase home value?
Yes. A dry, waterproofed basement adds usable square footage and removes a major buyer concern. Studies by the National Association of Realtors show moisture issues are among the top deal-killers in home inspections. Waterproofing typically returns 50–75% of cost at resale.
What is the difference between a crack injection and hydraulic cement?
Hydraulic cement is a surface patch — fast-setting, good for stopping active water flow temporarily. Crack injection fills the full depth of the crack with epoxy or polyurethane. Injection is the permanent fix. Hydraulic cement buys time.
Does waterproofing a basement help with radon?
Partially. Sealing cracks and installing a proper drainage system with vapor barriers reduces radon entry points. For elevated radon levels (above 4 pCi/L), a dedicated sub-slab depressurization system is required alongside waterproofing.
Best time of year to waterproof a basement?
Late summer to early fall — ground is drier, excavation is easier, and the work is complete before winter freeze-thaw cycles begin. Avoid exterior work in frozen ground. Interior work can be done year-round.
How do I know if I need a sump pump?
Install a sump pump if water collects on the basement floor after heavy rain, if you’re in a flood zone or high-water-table area, or if you’re installing an interior French drain system. The pump is not optional in those situations — it is the system.