The Structural & Permitting Checklist Every California Homeowner Needs Before Removing a Load-Bearing Wall
Opening up a closed kitchen or merging two cramped rooms can transform how a California home lives. But when the wall carries part of the house, the project stops being demolition and becomes a structural redesign. Here’s what to resolve before the first piece of drywall comes off, with examples from a Sherman Oaks kitchen we took back to the studs.
How Do You Know If a Wall Is Load-Bearing?
A wall is load-bearing if it supports joists, rafters, another wall, or a beam above it. You can’t tell from the thickness. A standard 2×4 wall finishes at about 4½ inches (114 mm) whether it carries a second story or nothing at all.
Check these clues:
- Joist direction: A wall running perpendicular to floor or ceiling joists, especially near mid-span, is a strong candidate.
- Stacking: A wall directly under another wall, or over a girder, post, or footing in the crawlspace, is usually part of the load path.
- Joist splices: Joists that overlap or butt together on top of the wall are bearing on it.
- Exterior walls: Nearly all exterior walls are bearing.
- Drawings and history: Original plans and past permits show intent, but additions and earlier remodels often changed the structure.
Cracks near a wall can signal movement, but they don’t prove the wall is structural. Construction Pedia’s guide on why plaster cracks explains what different crack patterns can mean.
Where Does the Load Go When the Wall Comes Out?
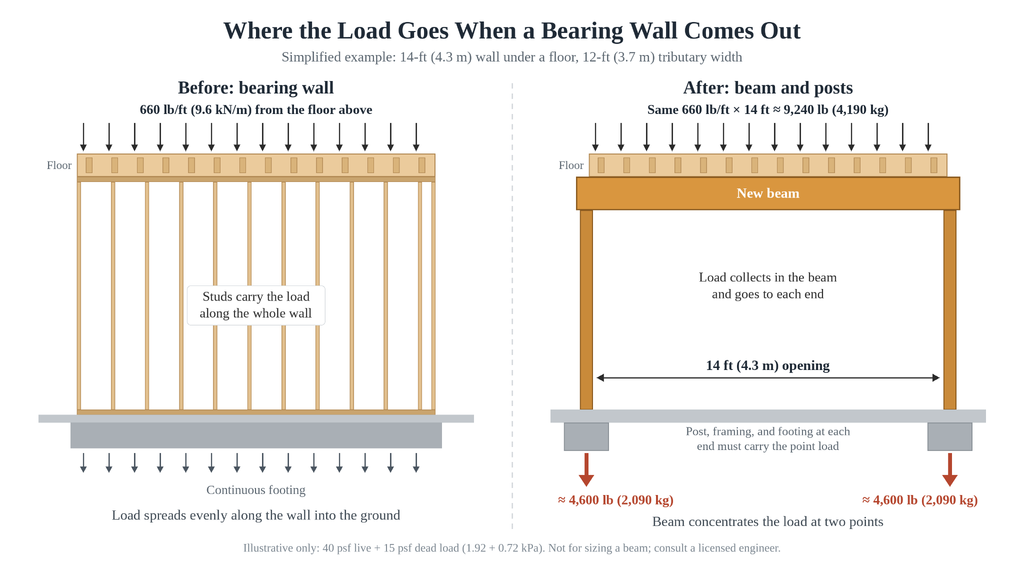
The load moves into a new beam, and the beam delivers it to two concentrated points at its ends. A wall spreads weight evenly along its length; a beam funnels it all to the posts.
The starting point is the design load. The California Residential Code (CRC), Part 2.5 of Title 24, sets minimum live loads in Table R301.5 and the roof live load in Section R301.6:
| Area | Minimum live load | Metric equivalent |
| Living areas | 40 psf | 1.92 kPa |
| Sleeping rooms | 30 psf | 1.44 kPa |
| Attics with limited storage | 20 psf | 0.96 kPa |
| Attics without storage | 10 psf | 0.48 kPa |
| Roofs | 20 psf | 0.96 kPa |
A typical wood floor adds roughly 10–15 psf (0.48–0.72 kPa) of dead load on top of that.
Here’s a simplified example. Say you remove a 14-foot (4.3 m) wall under a floor, with joists spanning 12 feet (3.7 m) on each side. The wall supports half of each span, a 12-foot tributary width:
- 55 psf × 12 ft = 660 pounds per linear foot (9.6 kN/m)
- 660 plf × 14 ft = about 9,240 pounds total (4,190 kg)
- About 4,600 pounds (2,090 kg) at each end of the beam
That’s for one floor. If the wall also carries roof framing, add the roof live load plus the roof’s own weight. Concrete or clay tile, common across California, weighs several times more than composition shingles. In parts of the Sierra, snow loads can exceed 100 psf (4.8 kPa).
The beam also has to be stiff enough. CRC Table R301.7 generally limits floor deflection to L/360: for a 14-foot span (168 inches), that’s under ½ inch (13 mm) at mid-span. On a 24-foot (7.3 m) span, the same ratio allows about 0.8 inch (20 mm) spread across the entire ceiling, which is why long beams are often sized for stiffness rather than strength.
To see how span and load interact, try Construction Pedia’s Beam Load Calculator. Use it, and the example above, to understand the loads involved. Actual beam sizing requires an engineer’s evaluation of your home’s specific framing and conditions.
Do You Need a Structural Engineer?
In practice, yes: most California building departments require beam calculations and details for a bearing-wall removal, typically from a California-licensed engineer.
The engineer specifies:
- Beam material and size (for example, a 3½” × 11⅞” (89 × 302 mm) LVL, a glulam, or a steel W-shape)
- Post sizes and the number of jack and king studs at each end
- Connection hardware (post caps, bases, hangers, straps)
- Minimum bearing length at each end
- Any new footings or floor reinforcement
The three most common beam materials compare like this:
| Material | Common residential depths | Handling | Relative cost | Best for |
| LVL | 9¼–18 in (235–457 mm) | Light enough for a small crew; plies can be carried in separately | $ | Most residential openings |
| Glulam | 9–18+ in (229–457+ mm) | Heavier single piece | $$ | Exposed beams where appearance matters |
| Steel W-shape | Shallower than wood for the same span | Heavy; often needs lifting equipment | $$$ | Long spans or flush beams with limited depth |
For a feel for how LVL depth changes with span, see Construction Pedia’s LVL beam span calculator. Its overview of types of construction materials is also a helpful background, but final material choice should come from project-specific calculations.
Is the Wall Also Resisting Earthquakes?
It may be: in California, some interior walls are braced or shear walls that resist lateral seismic and wind forces.
Newer shear walls are usually sheathed with plywood or OSB and nailed in a specific pattern, sometimes with hold-down hardware at the ends. Older homes often used diagonal let-in bracing instead: wood braces notched into the studs at an angle. When opening the kitchen walls on the 2024 Sherman Oaks remodel, that diagonal bracing was the first thing behind the drywall.
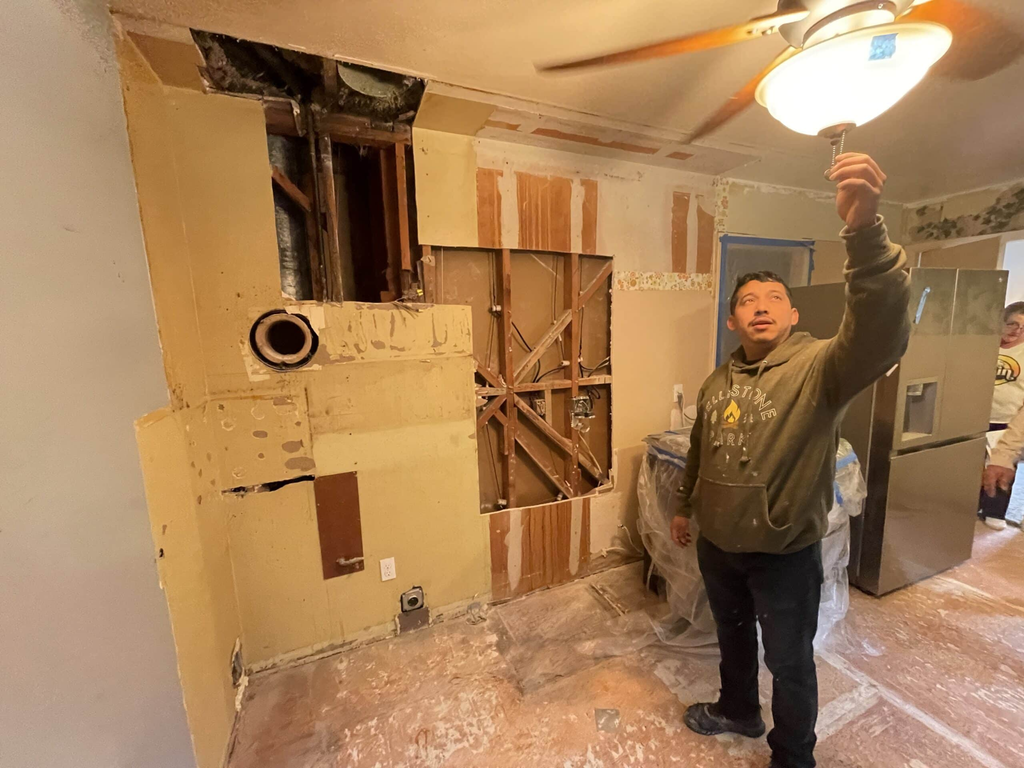
[Caption: “Diagonal bracing exposed behind the drywall during a Sherman Oaks kitchen remodel.” Photo credits: Denali Builders & Design]
Removing a braced or shear wall reduces the home’s lateral capacity, so the engineer may need to add bracing elsewhere or design a moment frame.
What’s Running Through the Wall?
Most walls in kitchens, halls, and bathrooms carry at least one utility. Before demolition, confirm whether the wall contains:
- Electrical circuits, switches, and receptacles
- Plumbing supply lines, drains, or vent stacks
- Gas lines
- HVAC ducts or returns
- Refrigerant lines
- Low-voltage, security, or network cabling
A vertical drain or vent stack is often the biggest surprise because it may need rerouting through floors and the attic. Gas line changes require a permit and a pressure test.
In Sherman Oaks, we took the kitchen back to the studs so the wiring, plumbing, and window wall could be rebuilt before any cabinetry went in. Running new lines with the framing exposed is far simpler than fishing them through finished walls later.
Which Permits Do You Need?
You need a building permit for the structural work, and usually separate electrical, plumbing, or mechanical permits if those systems move. Title 24 sets statewide standards, while your city or county handles plan review and inspections.
Confirm with your building department:
- Whether structural drawings and calculations are required
- Whether an engineer’s stamp and signature are required
- Which trade permits apply
- Which inspections are required, and in what order
- Whether zoning, historic-district, or coastal rules apply
- Whether your HOA needs to approve the work
For example, the Los Angeles Department of Building and Safety lists structural alterations and adding or removing walls among work subject to its permit and plan-review procedures. Requirements vary between jurisdictions, so don’t assume one city’s process applies to another.
How Is the House Supported During Demolition?
Temporary shoring carries the load while the wall is out, usually as temporary stud walls or adjustable steel posts set about 2 to 3 feet (0.6 – 0.9 m) back from the wall on one or both sides.
A sound shoring plan answers:
- Where the supports go and what load each one carries
- How that load reaches the structure below (a shore on a framed floor may need its own support underneath)
- The sequence for removing the wall and installing the beam
- When the permanent beam and posts take over
- When the shoring can come out
Shoring rests on a plank or plywood to spread the load and should be snug instead of jacked. Over-jacking can lift the floor above and crack finishes upstairs.
Can the Foundation Handle the New Point Loads?
Often it can’t be without change, because the foundation was designed for a load spread along the wall, not several thousand pounds landing on a single post.
The engineer should confirm:
- Whether each post lands over an existing footing
- Whether a new pad footing is needed
- Whether the floor framing below each post needs blocking, a new girder, or a post down to the crawlspace
- Whether bearing at each end meets the minimum length (CRC Section R502.6 requires at least 1½ inches (38 mm) of bearing on wood for joists; many engineered beams need more)
Many older California slabs are only about 3½ to 4 inches (89–102 mm) thick and weren’t designed for concentrated loads. Cutting in a new reinforced footing under each post is common. Construction Pedia’s guide to types of foundations in construction explains how different systems carry loads.
Will the Beam Be Flush or Dropped?
That’s a design choice to make before construction: a flush beam sits within the ceiling plane, while a dropped beam hangs below it.
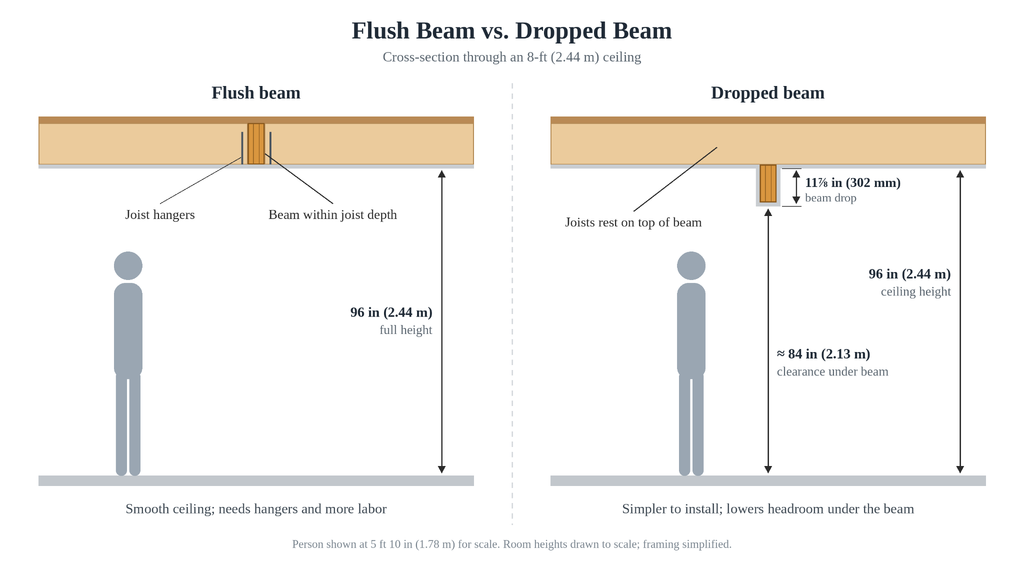
The difference is real. An 11⅞-inch (302 mm) dropped beam in an 8-foot (2.44 m) ceiling leaves about 7 feet (2.13 m) of clearance underneath. That’s fine for a doorway but can feel heavy across a new kitchen sightline. Flush beams need joist hangers, more labor, and sometimes temporary removal of upstairs flooring, so they usually cost more.
The beam also affects cabinet heights, lighting layout, HVAC routing, and flooring transitions where two rooms meet. Resolve these conflicts during design and pre-construction planning, while changes are still on paper and cheap.
What Hidden Conditions Show Up in Older Homes?
Older homes often reveal lead paint, asbestos, rot, or past unpermitted work the moment a wall opens. Plan for:
- Lead paint: Likely in homes built before 1978. The EPA’s Renovation, Repair and Painting Rule requires lead-safe practices by a certified firm when disturbing more than 6 square feet (0.56 m²) of interior painted surface per room.
- Asbestos: Possible in joint compound, textured ceilings, and duct wrap in homes built before about 1980. Test before demolition.
- Rot and termites: Common around old plumbing leaks and exterior walls.
- Unpermitted alterations: Cut joists, missing posts, or undersized headers from past remodels.
- Outdated wiring: Knob-and-tube or ungrounded circuits that can’t simply be extended.
If the framing differs from the drawings, stop and call the engineer. Don’t improvise structural changes in the field.
What Does the Project Really Cost?
The beam is often one of the smaller line items; engineering, permits, shoring, utilities, and finishes usually add up to more. A complete budget includes:
| Cost category | What it covers |
| Structural engineering | Site visit, calculations, stamped drawings |
| Permitting | Application, plan review, permit fees |
| Temporary shoring | Equipment, labor, installation and removal |
| Structural materials | Beam, posts, connectors, hardware |
| Foundation work | New footings or floor reinforcement |
| Utility relocation | Electrical, plumbing, gas, HVAC |
| Hazard testing/abatement | Lead and asbestos testing and removal |
| Demolition | Wall removal and debris disposal |
| Finishes | Drywall, ceiling and floor patching, trim, paint |
Two-story homes, flush beams, new footings, and utility reroutes all push costs up. Ask for a line-item bid and set aside a 10–20% contingency for conditions found after the wall opens. Construction Pedia’s home renovation cost guide can help you fit the work into a larger budget.
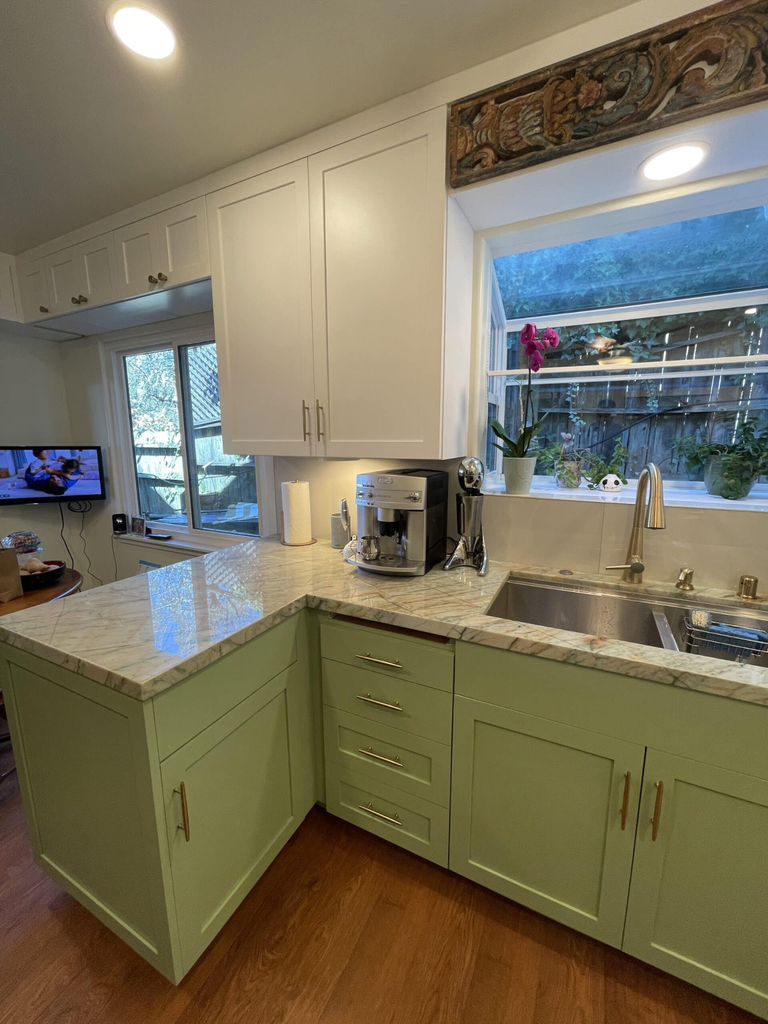
[Caption: Finish work, from drywall and trim to new cabinets and countertops. Photo credits: Denali Builders & Design.]
What Are the Most Common Myths About Removing Load-Bearing Walls?
Most costly mistakes start with one of these five assumptions.
“Interior walls aren’t load-bearing.” Many are, especially walls near the center of the house that support joists from both sides.
“A beam sized to the opening width is enough.” Span is only one input. Tributary area, roof type, point loads, and deflection limits all drive the size.
“If the wall is gone, the job is done.” The posts, floor framing, and foundation under each beam end carry the redirected load and must be checked.
“A single-story home doesn’t need engineering.” Ceiling and roof framing still bear on interior walls, and tile roofs are heavy.
“Permits are optional for interior work.” Structural alterations require permits. Unpermitted work can surface during a sale inspection and may have to be opened up and corrected.
Conclusion
Removing a load-bearing wall in California is a structural redesign: the beam, posts, framing, and foundation under each end all have to be engineered, permitted, and inspected. Start by confirming what the wall supports, then follow the load path to the ground. In the simplified example above, a 14-foot (4.3 m) opening put about 4,600 pounds (2,090 kg) on each post, a concentrated load many older 3 1⁄2-inch (89 mm) slabs weren’t designed to carry.
From there, map the utilities inside the wall, settle flush vs. dropped before construction, plan the shoring sequence, and set aside a 10–20% contingency for what turns up behind the drywall. Bring in a California-licensed engineer and confirm permit requirements with your city or county before the first stud comes out.
Frequently Asked Questions

Related Posts